Bubblewrap is a command-line sandboxing tool for creating unprivileged containers and securely running Linux applications. It’s uses user_namespaces feature for creating unprivileged containers. It can be configured to restrict access to certain resources, such as the network or the file system. Additionally, bubblewrap can run GUI applications. In fact, this is what most users need.
However, the use of Bubblewrap can be a bit complex. For this reason, users who are relatively less knowledgeable may want to use Firejail. So, I will try to explain how to use bubblewrap simply.
How to use Bubblewrap?
First, install bubblewrap.
Note: To use Bubblewrap, the kernel you use must support
user_namespacesfeature.
Now, we have a CLI tool named bwrap.
Basics
First, understanding the common parameters. We have --bind parameter. This parameter mounts the given path to the target path in sandboxed environment. An example:
bwrap --bind /tmp $HOME "$@" # The phrase "$@" refers to the command to be entered. Such as bash, firefox, ls...With this command, we mounted /tmp to $HOME path in the container. So, /tmp is our home directory in the sandboxed environment now.
Let’s look at another parameter. We have --ro-bind parameter now. This parameter is similar to --bind parameter but this parameter mounts the path read-only. So, we can only read the path in sandboxed environment. An example:
bwrap --ro-bind / / "$@"With this command, we mounted / to / path in the container. So, we can only read / path in sandbox. But exceptions can be added. For this, set the read-only parameter before the read and write parameter. Just like that:
bwrap --ro-bind / / --bind /tmp $HOME "$@"Let’s see how we can create tmpfs file systems. (temporary file systems)
bwrap --tmp /tmp "$@"Now, we have a /tmp directory as tmpfs.
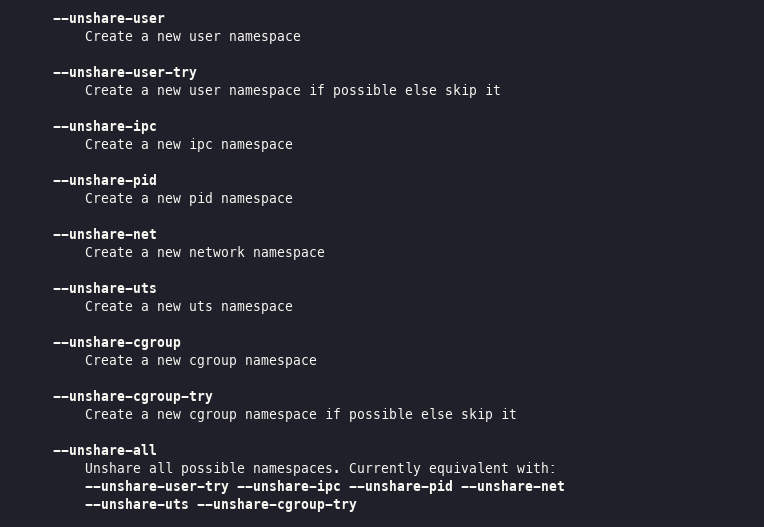
There is a parameter named --unshare-pid. This parameter isolate PIDs from sandbox and applications in the sandbox can’t see running programs out of the sandbox environment.
bwrap --unshare-pid "$@"One more parameter again. The name of the parameter is --unshare-user. This parameter creates a new user in namespace and prevents it from accessing the user’s information (id, groups etc.) on the host system.
bwrap --unshare-user "$@"We have --unshare-net parameter. This parameter disconnects the network connection of the sandbox.
bwrap --unshare-net "$@"And finally, we have --unshare-all parameter. This parameter stops the sharing of all features specified at bwrap(1) man page.
Now, we can start preparing the script.
Scripting
First, create a script file (may the name is sandbox.sh) and write these commands to the file. We will add symbolic links for some folders using --symlink parameter. Some applications need this.
#!/bin/sh

bwrap --symlink usr/bin /bin --symlink usr/bin /sbin \
	--symlink usr/lib /lib --symlink usr/lib /lib64 \
	"$@"
/usr, /opt and /etc directories contains important files and configs. So, we will mount this directories as read-only.
#!/bin/sh

bwrap --symlink usr/bin /bin --symlink usr/bin /sbin \
	--symlink usr/lib /lib --symlink usr/lib /lib64 \
	--ro-bind /usr /usr \
	--ro-bind /etc /etc \
	--ro-bind /proc /proc \
	--ro-bind /dev /dev \
	"$@"
/var, /tmp and /run directories contain temp files. So, mount this directories as read-write tmpfs. And create a user directory in /run.
#!/bin/sh

bwrap --symlink usr/bin /bin --symlink usr/bin /sbin \
	--symlink usr/lib /lib --symlink usr/lib /lib64 \
	--ro-bind /usr /usr \
	--ro-bind /etc /etc \
	--ro-bind /proc /proc \
	--ro-bind /dev /dev \
	--tmpfs /var \
	--tmpfs /tmp \
	--tmpfs /run --dir /run/user/$UID \
	"$@"
Mount /dev and /proc directories with them own mount type.
#!/bin/sh

bwrap --symlink usr/bin /bin --symlink usr/bin /sbin \
	--symlink usr/lib /lib --symlink usr/lib /lib64 \
	--ro-bind /usr /usr \
	--ro-bind /etc /etc \
	--ro-bind /proc /proc \
	--ro-bind /dev /dev \
	--tmpfs /var \
	--tmpfs /tmp \
	--tmpfs /run --dir /run/user/$UID \
	--dev /dev \
	--proc /proc \
	"$@"
First, unshare all resources with container and then only share network. So, we will have a network connection (in most cases, this is needed) but will have unshared user, PIDs etc.
#!/bin/sh

bwrap --symlink usr/bin /bin --symlink usr/bin /sbin \
	--symlink usr/lib /lib --symlink usr/lib /lib64 \
	--ro-bind /usr /usr \
	--ro-bind /etc /etc \
	--ro-bind /proc /proc \
	--ro-bind /dev /dev \
	--tmpfs /var \
	--tmpfs /tmp \
	--tmpfs /run --dir /run/user/$UID \
	--dev /dev \
	--proc /proc \
	--unshare-all --share-net \
	"$@"
Now, we need to determine how we want to use the home directory in the sandbox. If you have the idea of using the same sandbox over and over again, assign the home directory to a folder permanently. Although not so good for security, it is good for continuous usability.
I create a directory named .bwrap in ~/ path. And I create the directory which will be our home directory in ~/.bwrap. May directory name is ctr1.
mkdir -p ~/.bwrap/ctr1 # create directories
# now add to the script
#!/bin/sh

bwrap --symlink usr/bin /bin --symlink usr/bin /sbin \
	--symlink usr/lib /lib --symlink usr/lib /lib64 \
	--ro-bind /usr /usr \
	--ro-bind /etc /etc \
	--ro-bind /proc /proc \
	--ro-bind /dev /dev \
	--tmpfs /var \
	--tmpfs /tmp \
	--tmpfs /run --dir /run/user/$UID \
	--dev /dev \
	--proc /proc \
	--unshare-all --share-net \
	--bind $HOME/.bwrap/ctr1 $HOME \
	"$@"
If you want your home directory to be a temporary directory and to be deleted when the sandbox is closed. Create and mount a tmpfs as home directory.
#!/bin/sh

bwrap --symlink usr/bin /bin --symlink usr/bin /sbin \
	--symlink usr/lib /lib --symlink usr/lib /lib64 \
	--ro-bind /usr /usr \
	--ro-bind /etc /etc \
	--ro-bind /proc /proc \
	--ro-bind /dev /dev \
	--tmpfs /var \
	--tmpfs /tmp \
	--tmpfs /run --dir /run/user/$UID \
	--dev /dev \
	--proc /proc \
	--unshare-all --share-net \
	--tmp $HOME \
	"$@"
Actually, the script is completed for non-GUI and soundless applications. So, CLI and TUI. But if you want to use GUI applications and sound. Let’s continue.
First, we have two options for GUI.
- Wayland (recommended)
- X11
X11 is a window system with more frequency of use. But there are some security vulnerabilities and bubblewrap can’t block them. With these vulnerabilities, it is possible to escape from the sandbox environment. And we don’t want it. So I suggest you use Wayland or at least open the sandbox on a Wayland session. Still, I will show how to use it with X11.
First, let’s take care of X11. Mount X11 sockets and .Xauthority file in ~/ directory.
#!/bin/sh

bwrap --symlink usr/bin /bin --symlink usr/bin /sbin \
	--symlink usr/lib /lib --symlink usr/lib /lib64 \
	--ro-bind /usr /usr \
	--ro-bind /etc /etc \
	--ro-bind /proc /proc \
	--ro-bind /dev /dev \
	--tmpfs /var \
	--tmpfs /tmp \
	--tmpfs /run --dir /run/user/$UID \
	--dev /dev \
	--proc /proc \
	--unshare-all --share-net \
	--tmpfs $HOME \
	--ro-bind $HOME/.Xauthority $HOME/.Xauthority \
	--ro-bind /tmp/.X11-unix/X0 /tmp/.X11-unix/X0 \
	"$@"
We can use GUI applications with X11 now. But as I said before. I don’t recommend using X11. Let’s see how we can use it with Wayland.
First, we need to find the Wayland socket. Wayland is an implementation and may vary according to the Wayland session you use. We cannot give an address for sure. But generally, socket names are like wayland-0-wayland-9. This socket is in /run/user/$UID directory. You can find it manually or find with this command.
find /run/user/$UID -iname "wayland-*" 2>/dev/nullThe outuput is like that:
[slime@arch ~]$ find /run/user/$UID -iname "wayland-*" 2>/dev/null
/run/user/1000/wayland-1
/run/user/1000/wayland-1.lock
First file is path of the our Wayland socket. We can add this path to the script. And set WAYLAND_DISPLAY environment variable according to the output. For set environment variables, use --setenv parameter. Syntax is --setenv VAR_NAME value
#!/bin/sh

bwrap --symlink usr/bin /bin --symlink usr/bin /sbin \
	--symlink usr/lib /lib --symlink usr/lib /lib64 \
	--ro-bind /usr /usr \
	--ro-bind /etc /etc \
	--ro-bind /proc /proc \
	--ro-bind /dev /dev \
	--tmpfs /var \
	--tmpfs /tmp \
	--tmpfs /run --dir /run/user/$UID \
	--dev /dev \
	--proc /proc \
	--unshare-all --share-net \
	--tmpfs $HOME \
	--ro-bind /run/user/$UID/wayland-1 /run/user/$UID/wayland-1 \
	--setenv WAYLAND_DISPLAY wayland-1 \
	"$@"
We can add sound support. For this, we have two options again.
- PulseAudio
- PipeWire
There is no difference between these two options in terms of a sandbox environment. You can choose depending on what you use.
First option, set PulseAudio support:
#!/bin/sh

bwrap --symlink usr/bin /bin --symlink usr/bin /sbin \
	--symlink usr/lib /lib --symlink usr/lib /lib64 \
	--ro-bind /usr /usr \
	--ro-bind /etc /etc \
	--ro-bind /proc /proc \
	--ro-bind /dev /dev \
	--tmpfs /var \
	--tmpfs /tmp \
	--tmpfs /run --dir /run/user/$UID \
	--dev /dev \
	--proc /proc \
	--unshare-all --share-net \
	--tmpfs $HOME \
	--ro-bind /run/user/$UID/wayland-1 /run/user/$UID/wayland-1 \
	--setenv WAYLAND_DISPLAY wayland-1 \
	--ro-bind /run/user/$UID/pulse /run/user/$UID/pulse \
	"$@"
Second option, set PipeWire support:
#!/bin/sh

bwrap --symlink usr/bin /bin --symlink usr/bin /sbin \
	--symlink usr/lib /lib --symlink usr/lib /lib64 \
	--ro-bind /usr /usr \
	--ro-bind /etc /etc \
	--ro-bind /proc /proc \
	--ro-bind /dev /dev \
	--tmpfs /var \
	--tmpfs /tmp \
	--tmpfs /run --dir /run/user/$UID \
	--dev /dev \
	--proc /proc \
	--unshare-all --share-net \
	--tmpfs $HOME \
	--ro-bind /run/user/$UID/wayland-1 /run/user/$UID/wayland-1 \
	--setenv WAYLAND_DISPLAY wayland-1 \
	--ro-bind "/run/user/$UID/pipewire-0" "/run/user/$UID/pipewire-0" \
	"$@"
The script was generally completed. You can save the file and make it executable as follows:
chmod +x sandbox.shAnd you can run commands with this script:
./sandbox.sh bash
./sandbox.sh chromium
WARNING: Some applications may not support Wayland or require additional adjustments. For example, Firefox needs MOZ_ENABLE_WAYLAND variable set as “1”. Or some Chromium builds need
--ozone-platform=waylandparameter.
Notice: Different applications may have different requirements. You may need to learn the basic parameters and adjust them.
Extra options
The extra options here may increase security. If you want to use it, you should add it to your script.
--new-session parameter: There is a security issue with TIOCSTI, (CVE-2017-5226) which allows sandbox escape. To prevent this, bubblewrap has introduced the new option ‘—new-session’ which calls setsid(). However, this causes some behavioural issues that are hard to work with in some cases. For instance, it makes shell job control not work for the bwrap command.
It is recommended to use this if possible, but if not the developers recommend that the issue is neutralized in some other way, for instance using SECCOMP.
--die-with-parent parameter: Ensures child process (COMMAND) dies when bwrap’s parent dies. Kills (SIGKILL) all bwrap sandbox processes in sequence from parent to child including COMMAND process when bwrap or bwrap’s parent dies. See prctl, PR_SET_PDEATHSIG.
Conclusion
Bubblewrap is a very nice tool and the great features of Linux are used. I tried to explain how it was used as much as I could.
However, it is never safe to run an unreliable software. Try to avoid this. But if you really need this. Here is a document!
Additionaly, if you want more user friendly experience, you can try these projects:
See Also
- https://wiki.archlinux.org/title/Bubblewrap
- https://wiki.archlinux.org/title/Bubblewrap/Examples
- https://lwn.net/Articles/686113/
- https://jvns.ca/blog/2022/06/28/some-notes-on-bubblewrap/
- https://regginator729.wordpress.com/2017/12/12/using-bubblewrap-as-sandbox/
- https://manpages.debian.org/testing/bubblewrap/bwrap.1.en.html