This document explains my personal network customizations on Linux systems. These customizations are to increase my internet usage speed, privacy and security. Some operations here may require special dependencies. I can’t guarantee its compatibility with your own Linux system or stability.
systemd-resolved
systemd-resolved is a systemd service that provides network name resolution to local applications. To use this program, you must have systemd on your Linux system.
systemd-resolved has a number of features such as DoT (DNS over TLS), DNSSEC validation and DNS caching. It has more features like mDNS but I don’t use these features.
DNS caching
Actually, we do not need to perform any configuration for this. systemd-resolved activates DNS caching by default. All we have to do is activate systemd-resolved. For this;
# ln -rsf /run/systemd/resolve/stub-resolv.conf /etc/resolv.conf
# systemctl enable systemd-resolved.service
Yes, systemd-resolved is working. Let’s see if DNS caching is active. Now we will query a domain name with resolvectl and look at how long it took and which resource is used. For this;
$ resolvectl query misile00.github.ioAnd results;
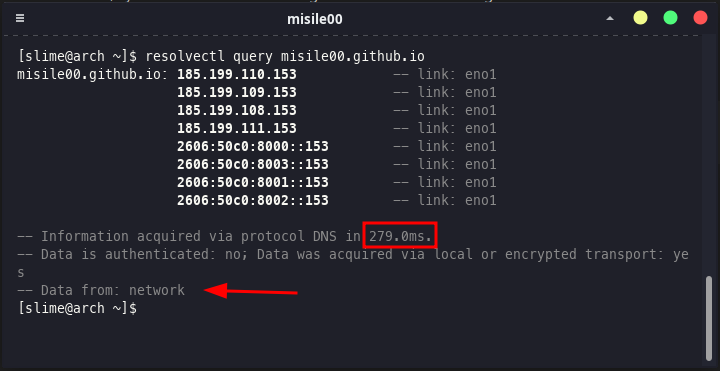 DNS query without cache
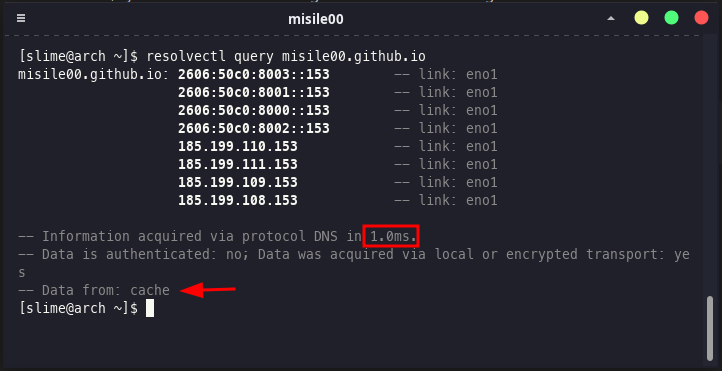 DNS query with cache
In order for systemd-resolved to cache a domain, a query must be sent to that domain at least once. The result of the first query is taken from DNS servers. Subsequent queries are from the cache.
DNS over TLS
DNS over TLS (DoT) is a network security protocol for encrypting and wrapping DNS queries and answers via the Transport Layer Security (TLS) protocol. The goal of the method is to increase user privacy and security by preventing eavesdropping and manipulation of DNS data via man-in-the-middle attacks.
systemd-resolved supports DNS over TLS and I am using systemd-resolved for DoT. For DoT, the DNS server you use must support this. Many DNS servers support this. For example; Google DNS, Cloudflare DNS and Quad9. I am using Cloudflare DNS and I will give the examples through it.
systemd-resolved doesn’t uses DoT by default. For this, we must make some configuration.
Setting the DNS server(s)
First, open the configuration file via a text editor. I’m using nano for this job.
# nano /etc/systemd/resolved.conf.d/dns_servers.confHere, we are change the DNS servers. I set this file as follows:
[Resolve]
DNS=DNS=1.1.1.2#security.cloudflare-dns.com 1.0.0.2#security.cloudflare-dns.com 2606:4700:4700::1112#cloudflare-dns.com 2606:4700:4700::1002#cloudflare-dns.com
Domains=~.
I’am using 1.1.1.1 for Families (Block malware option). If you don’t want to use it, you can replace it with normal Cloudflare DNS servers;
[Resolve]
DNS=1.1.1.1#cloudflare-dns.com 1.0.0.1#cloudflare-dns.com 2606:4700:4700::1111#cloudflare-dns.com 2606:4700:4700::1001#cloudflare-dns.com
Domains=~.
If you want another DNS server like Google DNS:
[Resolve]
DNS=8.8.8.8#dns.google 8.8.4.4#dns.google 2001:4860:4860::8888#dns.google 2001:4860:4860::8844#dns.google
Domains=~.
Syntax is basic:
[Resolve]
DNS=dns_server_ip_address#dns_server_dot_address
Domains=~.
Enabling DNS over TLS
First, open the configuration file via a text editor.
# nano /etc/systemd/resolved.conf.d/dns_over_tls.confSet the file like this:
[Resolve]
DNSOverTLS=yes
Now, you can test DNS over TLS is working.
For this, we use ngrep tool. DNS over TLS uses 853 port. If encrypted traffic passes through this port, this means DoT is active.
# ngrep port 853# ngrep port 53If first command gives an encrypted output and second command doesn’t give any output about network traffic. We succeeded!
You must restart systemd-resolved to apply these changes.
NetworkManager
NetworkManager is a program for providing detection and configuration for systems to automatically connect to networks. I have some configurations for it.
MAC address randomization
Randomizing MAC adress is important thing for privacy and anonimity in public networks (university, companies etc.)
We can another tools like macchanger but NetworkManager is a tool used by most people. I think there is no need to install extra tools.
For setting the MAC randomization, we have a few steps to be done. First, open the configuration file via a text editor:
# nano /etc/NetworkManager/conf.d/mac_rand.confSet the file like this:
[device-mac-randomization]
# "yes" is already the default for scanning
wifi.scan-rand-mac-address=yes

[connection-mac-randomization]
# Randomize MAC for every ethernet connection
ethernet.cloned-mac-address=random
# Generate a random MAC for each WiFi and associate the two permanently.
wifi.cloned-mac-address=random
We have two option for MAC randomization. random and stable. stable generates a random MAC address when you connect to a new network and associates the two permanently. This means that you will use the same MAC address every time you connect to that network. In contrast, random will generate a new MAC address every time you connect to a network, new or previously known. I’am using random option for more privacy.
You can test MAC randomization with this command;
ip link showThe output will be like this;
1: lo: mtu 65536 qdisc noqueue state UNKNOWN mode DEFAULT group default qlen 1000
link/loopback 00:00:00:00:00:00 brd 00:00:00:00:00:00
2: ens1f0: mtu 1500 qdisc mq state UP mode DEFAULT group default qlen 1000
link/ether 70:ca:9b:ce:67:ae brd ff:ff:ff:ff:ff:ff
“70:ca:9b:ce:67:ae” is your MAC adress. This adress will change on each network connection.
Using iwd as the Wi-Fi backend
iwd (iNet wireless daemon) is a wireless daemon for Linux written by Intel. The core goal of the project is to optimize resource utilization by not depending on any external libraries and instead utilizing features provided by the Linux Kernel to the maximum extent possible.
I use iwd instead of wpa_supplicant because it works faster during Wi-Fi scanning and contains much more features.
iwd can work in standalone mode but I use it with NetworkManager to benefit from the features of NetworkManager.
For use iwd, you need to install iwd package. Now, we must configure NetworkManager to use iwd as Wi-Fi backend.
For this, open the configuration file via a text editor:
# nano /etc/NetworkManager/conf.d/wifi_backend.confAnd set the file like this:
[device]
wifi.backend=iwd
Don’t forget, NetworkManager has experimental backend for iwd. You may not want to use it if you really have serious concerns about stability.
You must restart NetworkManager to apply these changes.
Firewall
A firewall is a network security system that monitors and controls incoming and outgoing network traffic based on predetermined security rules. I’m using a firewall to interrupt or allow the network access of applications. I use firewalld as firewall. Installation of firewalld is very basic. Just install firewalld package and enable/start firewalld.service.
The reason I prefer firewalld is simple, but probably any firewall app will do your job. For example, you can use ufw instead. It is also used too much.